Tuesday 20 August 2013

Let me correct you!!

Well at least let me show you a fun way to use the trusty correction fluid! Now recently I bought a pack of correction pens etc from a bargain shop, you got 2 correction pens (great for white highlighting) and a traditional pot of the correction fluid for the princely sum of 99p! Now it was the pens I really wanted but I stashed the fluid in my "might come in handy" pile. And you guessed it.... It did!!
So in this digital and predictive text age where would you use such a product? In your stamping of course!!
The pigment in correction fluid is really strong so I thought it would be ideal for highlighting a subject, so I stamped a fun image, our aptly named Man Flu stamp on to some patterned paper in black archival ink. Then using the brush applicator painted a border of the white fluid all around the edge of the image, being careful but not worrying too much if I caught the image (as you can draw in the missing bits with a black fine liner).
And low and behold the image pops out of the page. Simple and quick. Also looks amazing in altered book pages etc, best patterned papers for it are not to busy and simply tonal colour schemes.

Have fun and happy crafting

Ali xx

Wednesday 10 July 2013

Don't Distress it is only Christmas in July!!

I know it is early to be thinking about Christmas especially in the middle of a glorious heat wave, but that is the way of card making and especially when preparing samples and demos for TV. So Christmas is in full swing!! Ho Ho Ho! But the kinds of techniques I try and share here are generic and can be altered for any occasion, so even if you are not feeling festive give them a go! So distress embossing in another form.

 First I created a background by inking with antique linen, then repeat stamped out music background stamp in frayed burlap. Then let it dry for a bit. Place the mask over the top and ink through with a piece of cut and dry loaded with perfect medium. Remove the mask and apply black embossing powder. Tip off the excess, you will find the odd bit clings to the background but that can be removed with a dry brush or left for a more distressed look. Heat set the powder from the back. Once it is set and cooled, reposition the mask, and with out re-inking your cut and dry, just dab randomly through the mask, not to much. Remove the mask and sprinkle on the gold powder (try different colour combos you will be amazed at the effects you get). Heat set the gold from above, not too much or the black may lose its definition. I love this effect.

Enjoy and Happy Crafting

Ali xx

Monday 1 July 2013

I'm forever popping bubbles!!

Well who doesn't love popping the bubbles on bubble wrap... There is just something about it, and now I have discovered extreme popping!! I same some cute beads made online from ironed bubble wrap and knew I had to try!! So in the interest of science and craft I grabbed my iron (only time the iron is grabbed in excitement!!) and a selection if bubble wraps. Now you must remember to sandwich your bubble wrap between parchment to protect your iron, and enjoy! It is cool the bubbles pop and sink,   I even tried double layers of bubbles to make thicker pieces. My personal favourite was the larger bubbles, one side would go may and one side stayed shiny, I loved the contrast. When ironed you can then colour with alcohol inks, die cut etc. I grabbed my Tim Holtz tattered dies and fell in love with with the shapes just plain.
So a quick embossed background with my beautiful peacock mask, a simple greeting and beautiful white on white card was born! You have to give this a go!!

Happy Crafting

Ali xx

Thursday 20 June 2013

You are not doing it right it is swish and.....


Stamp! Sorry couldn't help the play on a line from Harry Potter on this one! This will be a mega quick card and blog post but I loved the feel of the card.
Simply take a pale distress ink (I used old paper) and placing the pad face down on your card swish it across in a fairly quick motion, so you get a band of colour. Dry it and then take your silhouette stamp and first stamp it in Black Soot ink and again dry it and then stamp another in a more pale colour such as pumice stone, slightly overlapping the black one, to make it look like it is stood behind. The drying between each stage is important as the damp ink can interfere with your stamping.

Easy and quick but really atmospheric!


Happy Crafting

Ali xx

Wednesday 5 June 2013

Sooty and Stamp!

I am having a bit of a revisiting old favourites on the technique front at the moment, as much as I love experimenting and trying new things I also take great pleasure in using old techniques with new stamps. And soot stamping is one of those revisited techniques. With our stunning Deer stamp it was just the perfect technique.
But seriously if you are going to try this at home I strongly recommend you do it on a clear work space with a bowl of water near by, I always do it on the draining board of the kitchen sink!! The reason is you are going to be using a naked flame, so care must be taken. To start you want glossy or coated card stock, white is most effective, then pass the card over the top of the flame, so the smoke deposited the soot on to the card, use only the middle of the card as the card is more likely to catch light if you try to go right to the edge. Once you have an area of soot large enough, blow out the candle and take a perfectly clean stamp and press it into the soot coated area and remove. The stamp picks up the soot leaving a perfect impression. Your stamp will need a good clean as the soot really grabs, but on your card you will need to fix the soot with hairspray or proper charcoal fixer. It is a stunning effect so enjoy but please be careful with naked flames!!

Happy Crafting

Ali xx

Wednesday 22 May 2013

Cracking up!!

That sum me up pretty well to be fair, but on this occasion I am referring to crackle effect! This is fun but not for the more impatient crafters, so do as I do, start it just before bed so you leave it over night...that stops you impatiently trying stuff too early! This works on card and wood so give it a go, you need 2 colours of acrylic paint and good old PVA glue! Choose your base colour and paint a coat of this. Let this coat dry completely, then slap on a coat of PVA glue, and straight on top of that paint your second colour of paint. Keep your strokes in one direction.
Leave to dry and crackle!! It is so cool you will be tempted to watch paint dry!! Once dry you can stamp and colour on the top. Simple but soo much fun!!

Happy crafting

Ali xx

Thursday 2 May 2013

I call it "Faux Laser"

Said in my best Dr Evil voice!! I love the effect of this technique, it really creates the sense of dimension and it is easy to do! All you need is a brown ink pad and a good white embossing powder and a nice stamp. So simply stamp your image in the brown ink (I used Frayed Burlap distress ink) then while the ink is still damp give it a little smudge. Make sure the image is dry and then re-stamp the image with an embossing ink, over the top of the smudged image, so the brown shows through. Then add the white embossing powder, heat set from behind and watch the whole design just pop out of the card!!

Simple but very effective!!

Happy Crafting

Ali xx

Thursday 18 April 2013

Wax lyrical!

I love to play and try things out, I know shocking you didn't know that about me did you?? And I will use anything I lay my hands on! So when I wanted to try something different for a background effect on a card my hand fell on an old candle I had lying around. I wanted to use it for a resist technique, which I have done before but I have traditionally done it over a mask like a brass rubbing, but this time I embossed my card with the beautiful Moroccan mask first. I left the mask under the card and the ribbed the candle over the embossing, this way the embossing is not squashed and the wax only catches the edges of the embossing. I them removed the mask and inked like crazy with a couple of distress inks, forest moss and gathered twigs. Then rub off any ink on the wax with a bit of kitchen towel and voila!! A lovely distressed background. Added a faux out of the box die cutting with one of the aperture masks and the card was nearly done! Final touch was to use a 4 ply hemp twine, carefully untwist a 1 inch section until it flips back on itself creating a four petal flower effect, glue it in with a dried rose and it is done!! Simple, honestly it is!!

Happy Crafting

Ali

Sunday 31 March 2013

Strings Attached!

Wow this is promising another blog post, I'm on a roll!! So I just wanted to share a card that came about after seeing a lovely card online, that was beautifully collaged with different stamps and me being me didn't really have the stuff to do it, so improvisation was required!! First instead of fancy matting and layering I decided to use my lovely apertures to create a focal panel, so a bit of inking with distress inks, bundled sage, faded jeans and tumbled glass, gave me a lovely panel of colour but it lacked the texture if the card I had seen. I needed a background stamp, but I didn't have one, but I did have some garden twine and an acrylic block, so I wrapped the twine around the block a few times, tied it in place and voila I had a background stamp. All the little fibres of the twine created lovely fine lines like pen strokes, so I inked and stamped it randomly through the aperture and created a lovely faux script effect! Then it was just a case of inking through the tulip silhouette mask slightly off set of the middle and a matt and layer here and the card was done!
So moral of the blog post, if you don't have what you need, improvise and sometimes you will surprise yourself!!

Happy Crafting

Ali xx

Tuesday 26 March 2013

Just Chalk it up!!

Ok not too long between posts, but enough time for the NEC show and a couple of fun Create and Craft shows and a pile of new products to have a good play with!!
One of the most used new products in my crafting arsenal at the moment is the aperture sets, these lovely masks are ideal for all sorts of techniques and make amazingly simple but effective cards. But they also mean you can let your creativity flow, and so I have!!
One of my favourite recent experiments was to make my own chalkboard paint. And it is so easy!! Simply mix a teaspoon of tile grout (the fine stuff is best) with a tablespoon of acrylic paint, mix well. Now apply to whatever surface, I have done jars but my favourite is on cards, so you can write little messages, I stipple the paint through an aperture on to a nice patterned paper, let it dry (which doesn't take long) then mat and layer. Add chalk on a string and away you go!!
Great fun and tonnes of potential projects in the pipeline with this.
Happy crafting

Ali xx

Sunday 10 March 2013

I know, I know

I am possibly the worst blogger in the land of blogdom!! But I have my excuses!! The last few weeks have just been crazy! Like proper crazy, very very long hours and hard work and I am only just starting to catch up!! But we have released a new DVD on using Masks, released some fab new designs of masks and some beautiful stamps!
So a quick share in this occasion as I haven't done much experimenting but have big plans over the next couple of weeks!!
What I have been trying to do is explore different card layouts and Pinterest has been an amazing source of influence. The card below is using the beautiful lighthouse stamp, coloured with distress markers, spritzed with water and stamped to give a lovely watercolour effect and then scraps of patterned papers patchworked in the background. The second card is a patchwork of background that were made during demonstrating at the trade show. When I demo I always create a huge stack of backgrounds many of which never make it to a finished card, but this style is a great way to use up these play pieces!
Right best get back to it!!
Happy Crafting

Ali xxx


Monday 28 January 2013

I can't plan...

I change my mind like the weather (just ask Paul) and this card is one of the prime examples!! I was going to demonstrate this card on Create and Craft today, but the stock ran out before my demos did!! so here is a little run down on how it came about.

It was going to be like wet stamping, where you ink the mask and lay it on wet card, let the colour bleed out and then over stamp! But shock horror I changed my mind and decided to lay the inked mask onto the wet card and then ran it through the Grand Calibur (on the nesties cutting sandwich) and wow I loved the effect. The colour was sort of washed out and around, leaving the mask design pale, and as the card I used was a pulp card (more like water colour card) it compacted slightly giving a slight embossed look. I matted and layered it, as I thought it needed nothing else. Hope you like it.

Happy Crafting

Ali

Sunday 20 January 2013

Transferring...

Last week we launched our washable verses on Create and Craft and they proved popular, so popular I didn't get to demo the below card. Now on first look you think "nothing special" a greeting stamped on patterned paper and matted up with co-ordinating papers. But the greeting is not stamped it is from the washable verses, these are black printed verses on 300gsm card, so how do you get it on to patterned paper??
Well the secret is in the fact that the ink is waterproof. So choose your greeting, and cover in Sellotape (I used the wide parcel tape as it covered the entire greeting with one piece), take the back of a teaspoon and run like billy o, you will see the tape adhere better to the card, then cut roughly out of the whole sheet and drop the tape covered greeting into a saucer of warm water. Leave it to soak for a while, and then run away the card, if it is difficult, leave to soak a bit longer. Then take a piece of kitchen towel and rub away any paper residue, until you are just left with the words on the back of the tape. Allow to dry, the tape will still be sticky so make sure you leave it to dry face down. When dry adhere to your patterned paper of choice! Simple!!

Enjoy

Happy Crafting

Ali xx

Saturday 12 January 2013

Plenty of dough!!

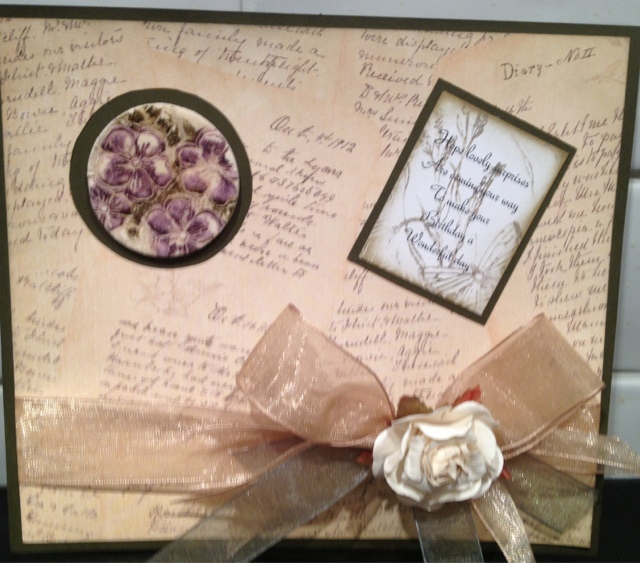
I know I know I am rubbish!! But at least I have plenty to share...so lets get started with the first post of the year!! I wanted to share my salt dough project! The dough itself is easy to make, 2 cups of plain flour, 1 cup if salt, 1 cup of warm water, mix together into a dough, unused dough will keep in the fridge. Then just roll out like pastry. Then use your stamps to make impressions in the dough, if you leave the stamp clean you can ink after the dough is dry and also brush on mica which looks amazing, or ink your stamp up and then as you stamp the colour is transferred to the dough. But my favourite is to fully colour the stamp, even into the recesses with distress markers, then wipe off the ink on the raised parts, now when you press it in to the dough the ink from the recesses is transferred to the raised elements of the design. Then simply use cookie cutters to cut out your designs. Leave to dry, in the air it will take a while or you can pop them in a warm oven to speed up the drying process. You now have stunning unique embellishments for cards. Fun and cheap!!

Happy crafting

Ali xx